

Welcome to the next installment of our series on all things brugmansia. We’ve spoken about making plans for your garden and how to purchase seed. Once you have your seed, its time to get it into some soil and wait for the magic!
Somewhere back in the Stone Age of brugmansia history, the first brugmaniacs were divided into two camps: those who soak seed before planting, and those who do not. This group was further subdivided into two more groups: those who peel seed and those who do not. There is some argument about which are the better procedures for preparing seed. For our purposes, I’ll just stick to the procedures I follow and let the chip fall.
Gather Your Supplies: Clean seed starting tray, plastic labels, sterile seed starting mix, spray bottle, powdered fungicide, light source (optional), heating mats (optional).
Prepare Your Seed Tray
Do yourself and your seeds a favor. Start them in a good sterile seed starting mix. The roots emerging from your seeds need a clear path that regular potting mix can’t provide. Seed starting mix has the texture of sawdust. No lumps, bumps, perlite, twigs, clumps, or fertilizer. Tender roots can easily find their way into seed starting mix.
I don’t soak seek. One of the worst problems with planting seed is developing damp off. Damp off has your healthy sprouts turning to mush and falling over dead. Think of damp off as The Terminator. Once you see your little guys keel over, say a prayer and start a new tray. With that in mind, you want to do all you can to prevent this nasty fungus from causing a genocide in your seed tray. What causes damp off? Soil and seeds that are kept too wet. Keeping your trays too wet is like hanging out a sign inviting damp off to move into the neighborhood. Why on earth would anyone want to put soaking wet seed into wet soil, then water the heck out of the whole thing for weeks on end? The outside, or corking, is designed to absorb water at the specific rate ideal for sprouting the germ inside. Just because you and I want to see sprouts at light speed doesn’t mean we’re doing what’s best for that little germ. My experience has been that wet into wet invites damp off, so I don’t recommend it.
I don’t peel seed. Peeling seed means you remove the outer husk or cork from the seed in order to hasten germination. If seed was meant to be peeled, the germs would be naked from the get go. Once again, being itchy about getting quick sprouts can kill those tender germs. The worst part is that peeling is tedious stuff that can result in you actually destroying the germ you’re trying to expose. WHOOPS! A little too much pressure and you’ve pulverized the germ. Do what you will, but I don’t peel seed.
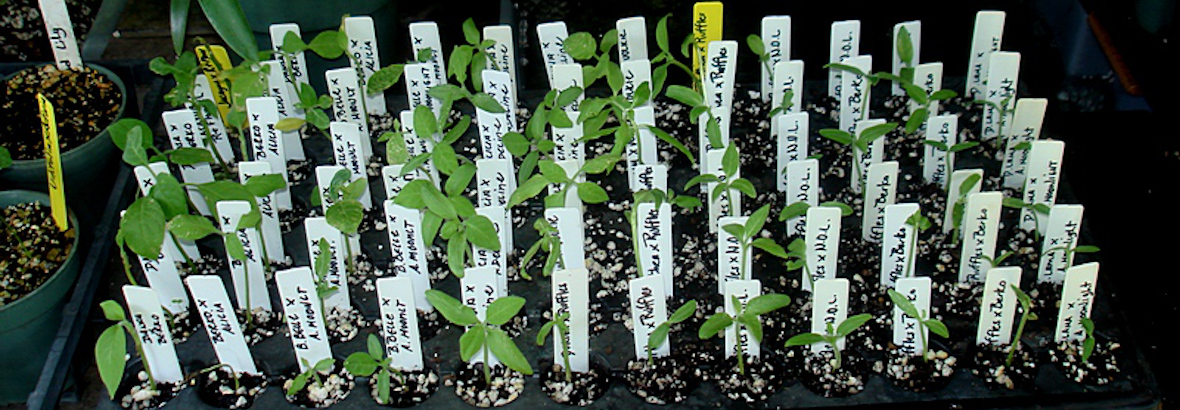
Fill your seed tray with the seed starting mix and water thoroughly. The mix should be evenly moist, not sopping wet. Make up your labels. Write the name of the cross, how many seeds you’re going to plant, the name of the hybridizer, and the date you planted them. All of this information has to remain with your plant until maturity, so its very important to get it right from the outset. Lay your seed out in well defined areas of the tray, making sure to delineate the various seed regions with barriers made with empty labels. Little fences. Push each seed into the mix about 1/4” down. The general rule of thumb is to push the seed in to the depth of it’s size.
Once your seeds are planted, fill your spray bottle with water and a little fungicide, and shake it up. Give the tray a light spritzing with this mix. I use a product called “Banrot”. It comes in a powdered form and serves to stave off or completely eliminate the fungus that causes damp off. Your spray bottle of fungicide will be your watering method of choice as the seeds sprout and grow. You’ll want to protect your sprouts from fungus until they’re transplanted to small individual pots. So, keep the mix coming.
Water your tray when the mix is getting a bit dry on top. Do this by spritzing the surface with your mix until the soil is rehydrated. Once again, drowning is not recommended. Easy does it on the watering!
Temperature: The ideal temperature for brugmansia sprouting is between 75 – 85 degrees. If you can’t maintain that temperature, you lessen the sprout rate. If its hotter, you lessen the sprout rate. If you need to raise the soil temperature, get a heat mat. Heat mats go under the seed tray and can be temperature regulated. If you get a mat without a temperature regulator, stick a thermometer in the soil and check on it regularly. If it reads too hot, you’re cooking your seed. Turn the mat off. If its too cool, use two mats. Whatever it takes to get the temperature correct, do it. It will pay off in the number of successful sprouts you get. Warmth is essential. It can make or break a successful tray.
Light: Light for growing is measured in foot-candles, which is the distance of light from the surface of the soil to the light itself. If you’re raising sprouts inside, this number has great bearing on sprout growth. If the light source is weak or too far away, the sprouts will do what’s called “stretching”. Stretching has sprouts growing very tall in order to reach the light source. This can result in excessively tall sprouts becoming top heavy and falling over. If the light source is too close, the sprouts can burn or be heated up enough to cook them. Again, check your planted seeds and sprouts daily. Make sure they’re warm, just moist, fungicide treated and well lit.
If you’re growing your seeds outside, make sure the nighttime temps remain warmish and keep them in a somewhat low light situation during the day. Remember, straight sun can cook them.
Fertilizing: Wait until your sprouts have developed four true leaves before you fertilize. Then, only 1/4 teaspoon of Miracle Grow to a gallon of water. Use that mix in your fungicide spray bottle when you rehydrate.
When your sprouts have developed four or more true leaves, you may transplant them to their own pots. We’ll cover seedling transplanting in our next installment.
Brugmansia seeds can sprout in a few days up to a couple of months depending on a number of factors. Most of those factors are enumerated above. If you get it right, you’ll witness the thrilling moment when those little green humps emerge from the soil!
You’re on your way to exciting times! Each successful sprout will become a tree sized, flowering brugmansia!
